Data room set up is an obligatory initial step whenever you start using a virtual data room (VDR) for the first time.
It’s a starting point of a quick and effective due diligence process since virtual data room software significantly streamlines document sharing and organization.
This article outlines the easy way to set up a virtual data room, covers all the steps you need to take when setting up a virtual data room, and provides a few pro tips.
Why is setting up a virtual data room so important?
Storing confidential information and sensitive documents online isn’t some novelty anymore.
Lots of companies choose to share their corporate documents via cloud service and, thus, make the inner processes and outer transactions more streamlined.
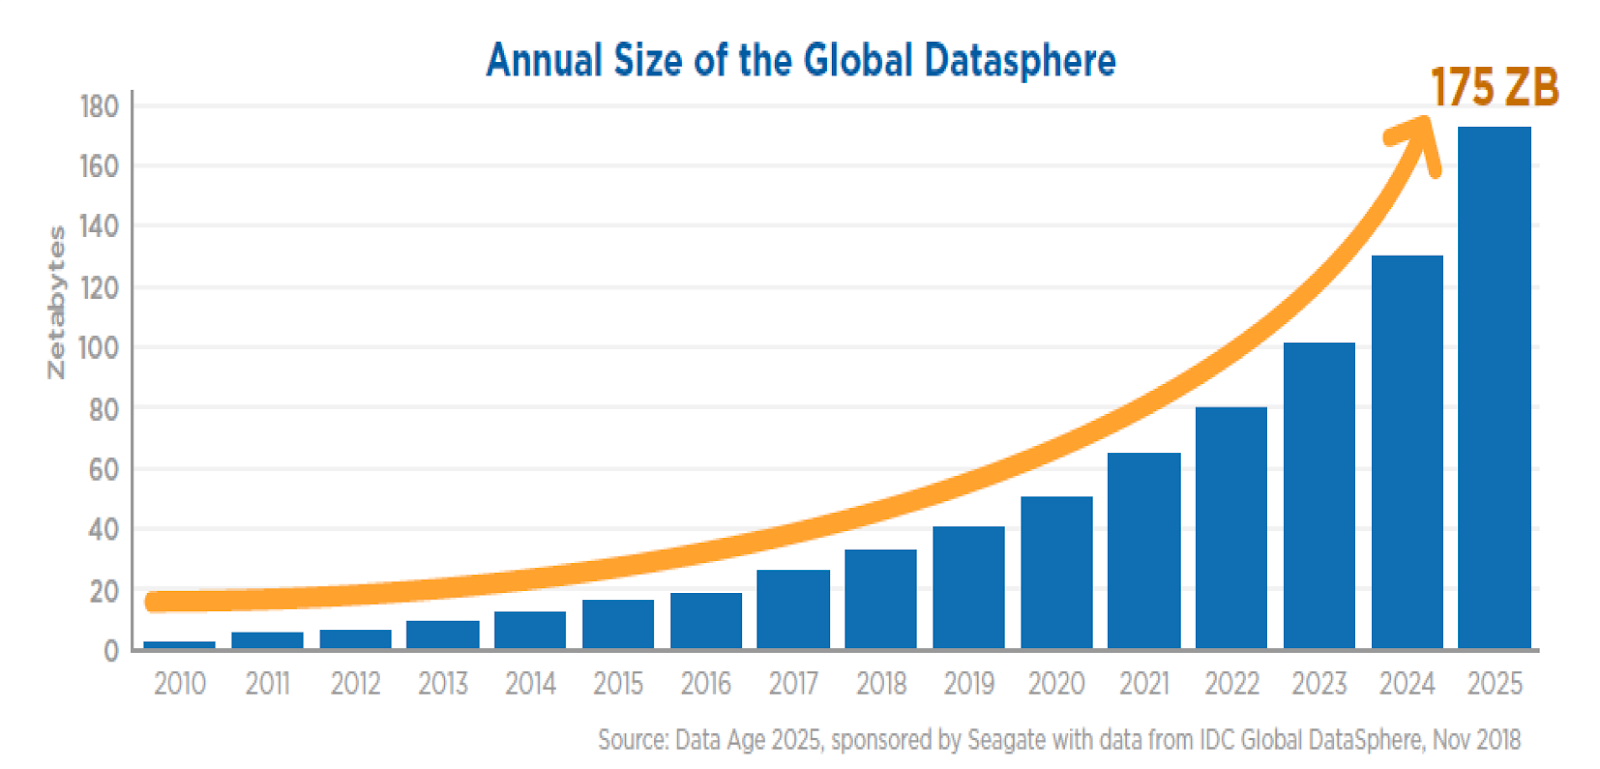
The proof of online storage demand is the annual size of the global datasphere. It’s expected to grow to 175 Zb by 2025.
Setting up a virtual data room comes with a number of advantages. These are the most obvious of them:
- Virtual data rooms allow for logically organizing large volumes of data. By setting up a due diligence data room, you can store all the documents and sensitive information about your company in one secure place. Thus, potential buyers and investors can view files anytime and anywhere. It also takes a few clicks to find particular documents or contracts, which is not an easy task to do when using a physical data room.
- 24/7 online data rooms’ availability facilitates the due diligence process. Potential investors and all other third parties that are involved in the due diligence process can access a virtual data room anytime, no matter the time zone. Virtual data rooms reduce the need to be physically present in the company’s building when reviewing documentation for due diligence.
- Virtual data rooms provide top-tier security measures. The key reason why modern companies prefer a virtual data room over a traditional physical space is the high-level security it offers. Virtual data room providers ensure your confidential documents are kept private and protected from unauthorized access by various security features. The most common are dynamic watermarking, redaction, granular permissions, and access control.
How long does it take to set up a data room?
There’s no universal estimated time needed to set up data room software. Each case is quite unique and solely depends on many factors: from the size of your business to whether you set up a virtual data room manually or opt for an automated setup. Additionally, different stakeholders will require different documents to meet their specific needs during the setup process.
Presumably, a startup will need a week or more to set up a virtual data room and initiate a due diligence process. Whereas a big corporation might need months to gather all the necessary sensitive documents, upload them to the virtual data room, and configure user permissions and access rights.
In case you already have all documentation prepared, the installation process itself will not likely take more than 30 minutes.
What determines how long it takes to set up a data room?
- The quality of the technical support of the virtual data room provider
- The amount of data you plan to upload to the data room
- The number of users for whom you need to customize the data access levels in the virtual data room
- User-friendliness of the virtual data room interface
- Availability of virtual data room checklist (created on your own or offered by a virtual data room provider)
- Size of your business
- Reasons you need a virtual data room for
- Corporate structure of your company and people involved in setting up a data room
- Availability of virtual data room features that aim to automate the setting up
Virtual data room setup guide
- Prepare corporate files you want to upload to the virtual data room. Ensure that you include up-to-date financial statements to provide investors with a complete overview of your company’s performance metrics and potential investment risks. Additionally, prepare a cap table as a critical component for fundraising and investment purposes, giving investors an overview of ownership and equity distribution within your company.
- Customize the virtual data room
- Create an admin account
- Organize files and folders
- Upload documents
- Set up security settings
- Set up user roles and access permissions
- Invite users and create groups
- Confirm software settings
Naturally, before setting up, you need to choose a reliable virtual data room for conducting due diligence.
For this, compare data room providers based on these criteria:
- Ease of use
- Features set
- Security measures
- Pricing plans
- Storage capacity
- Quality of customer support
- Training options
Once you’ve decided on the virtual data room vendor, you’ll need to take 9 simple steps to set it up.
Step 1. Prepare corporate files you want to upload to the virtual data room
The variety of files you’ll need to upload to the virtual data room depends on your needs. For example, if you require a virtual data room only for corporate documentation storage, you won’t probably need to upload highly confidential files that were prepared for financial transactions. New documents can be handled efficiently within a dedicated ‘Documents’ tab, allowing for bulk uploads and maintaining organization.
In case you require a virtual data room to conduct due diligence, you can opt for a due diligence checklist where all the documents you need to prepare ahead are listed. Some businesses follow their own checklist when considering fundraising. Others use the checklist a virtual data room provider offers.
Another thing you’ll need to do is to transform physical papers into digital ones. Digitization is especially relevant if you used a physical data room before.
Step 2. Customize the virtual data room
The majority of virtual data room providers offer customization features that enable you to tailor the data room virtual space to have your company’s branding look.
This step is equivalently important both for due diligence and simple corporate file sharing since it applies your company’s image to the virtual data room space.
With the majority of virtual data rooms, you can adjust:
- Logo
- Invitation emails
- Theme colors
- Header and footer
- Language settings
Step 3. Create an admin account
An administrator account allows you to maintain control over all the data room activity.
Admins are allowed to:
- Define access permissions to the files and folders
- Set user permissions
- Upload files
- Set up viewing expiration dates
- Assign tasks
- Get reports on the data room activity
As an administrator of the virtual data room, you’ll also be in charge of creating passwords and enabling two-factor authentication.
| Tip: Make sure your password consists of mixed letters (upper and lower case), numbers, and symbols, has no ties to your personal information, and is hard to guess. |
Step 4. Organize files and folders
The next stage is to create a logical organizational system for your virtual data room to make documents easily accessible.
To have effective deal transactions, you need to ensure it’’s easy for potential buyers and investors to search for the required documents and review them by having information organized. For this, create folders and subfolders and give each file a clear name. This way, multiple parties will easily understand what documents a particular folder contains and identify what the document is about without opening it.
For example, if your company considers an M&A round and prepares for due diligence, your virtual data room should have at least such folders:
- Financial documents
- Legal documents
- Human resources documents
- Taxes information
- Intellectual property documents
- Asset documents
To streamline the files’ organization, the majority of virtual data rooms offer dedicated features that make this process automatic. Some of the most common data room tools are:
- Automated data room index numbering
- Full-text search
- Integrations with popular applications such as Dropbox or Windows Explorer
| Tip: Regularly monitor whether each virtual data room folder has all the required documents and make sure they’re up-to-date. |
Step 5. Upload documents
When the preparation stage is complete, proceed with documents upload.
Modern virtual data rooms make this process smooth and fast thanks to such features as drag-n-drop and bulk upload. With their help, you need to make only a few clicks and wait till all the files will be uploaded.
Naturally, the larger volume of documents you upload, the longer it will take.
Step 6. Set up security settings
The reason modern companies choose virtual data rooms over a physical data room is the security online data rooms provide. And this is exactly what you can manage after uploading files to the VDR space.
You can tailor the security settings to each document, and, thus, ensure it an extra layer of security and keep personally identifiable information protected, keeping information safe. Some of the most common security features virtual data rooms offer are:
- Dynamic watermarking
- Redaction
- Fence view
- Remote shred
Managing sensitive data securely within the virtual data room is crucial for organizations handling confidential information.
Step 7. Set up user roles and access permissions
Before adding users, investment bankers, and stakeholders to the virtual data room space, decide on their access rights since the safety of confidential documents is the top priority.
Identifying and evaluating the risks involved in setting up user roles and access permissions is crucial. Access rights are continually monitored by the administrator of the virtual data room. Admins can decide who can view what files and for how long. These are a few examples of user roles and their access permissions you can set up in your data room:
Data rooms play a significant role in mitigating the risk of unauthorized access and document alteration.
- Admin. This person has full control over the virtual data room, documents inside, and security settings.
- Management. This is the management of the company. They usually have access to almost all files inside the VDR but aren’t assigned to any actions or administrative obligations.
- Staff. These are employees who can require access to different folders and files. They usually can upload data, edit documents, and rename files (if allowed by the admin).
- Clients. This group typically only has access to the client folders.
- Finance. Users that are related to finances will need access to all the financial documents.
- Prospective investors. This group requires access to all the due-diligence-related documentation such as balance sheets, taxes information, income statements, etc.
- Established investors. This group includes investors who are close to deal closure and might require access to highly confidential information.
| Pro-tip: Enable NDAs as an obligatory matter of policy. Always have each person digitally sign a non-disclosure agreement before granting them access to your virtual data room space. This way, you legally protect your company from any data leaks. |
Step 8. Invite users and create groups
After all the documents are uploaded and access rights are set, the final step is to invite users.
This is easy to do with the bulk invite feature most of the data rooms provide. Just make a few clicks, and all the required people will receive invitation emails with one secure VDR link. You can then modify access rights for each user if you need or add everyone manually from the start. Managing documents and files all within one platform ensures convenience and efficiency, allowing seamless transformation, retrieval, and classification of documents.
| Tip: Before sending users invitations, run a test. Create a test group that will receive the first invitation emails and will be able to check whether all permissions work correctly. |
Step 9. Confirm software settings
After you’ve double-checked all the security settings and folders’ content, start using a virtual data room. Data security plays a critical role in protecting sensitive information, ensuring that access permissions and confidentiality are maintained. Now you can control the activity inside your VDR space and get reports showing what files were viewed, by whom, and when.
Deal rooms are essential in facilitating transactions by providing a secure space for storing and sharing sensitive company documents. Data rooms also centralize documents necessary for transactions, aiding in communication and analysis during due diligence processes.
In case you need any extra help or training, contact the support team of the virtual data room provider.
Data Room Analytics and Reporting
Data room analytics and reporting provide valuable insights into user activity and document access. This information can be used to track user engagement, identify potential issues, and optimize the data room for future use. Analytics and reporting tools can also help companies to monitor the due diligence process, track the progress of potential investors, and identify areas for improvement. Some common metrics that are tracked in data room analytics include user login activity, document views, and downloads. By analyzing these metrics, companies can gain a better understanding of how their data room is being used and make data-driven decisions to improve their business transactions.
Takeaways
To sum up the recommendations given in the article, this is what you need to do to set up a virtual data room:
- Choose the reliable VDR solution
- Prepare right documents you need to include in your virtual data room
- Customize your virtual data rooms space
- Create an admin account to monitor inside activity and manage access rights
- Make up a clear structure of folders and subfolders
- Upload the data
- Configure security settings
- Take care of user roles and access permissions
- Invite users via email using one secure link
- Confirm software settings
Choosing a comprehensive platform is crucial for setting up a virtual data room effectively. The only cost to set up a data room is your time. However, by following the tips given above and opting for the automated features most virtual data rooms offer, setting up a data room won’t take you long. Various organizations utilize data rooms to manage sensitive information securely, ensuring that their chosen solutions protect valuable data.